Speed Up Your App Actions with Floating Action Button

By Appilix Software
May 7, 2025 • Updated June 27, 2026
The floating action button is a standout element that can transform the user experience in your app. If you want to make your app more interactive and accessible, adding a floating action button with Appilix is a smart choice. Many leading apps now use this feature to streamline important actions. In this article, you will learn how to effectively implement it in your own project.
Mobile apps thrive on simplicity and speed, both for users and developers. Users expect to reach their desired features with as few taps as possible. A floating action button (FAB) creates a direct shortcut to essential app actions, helping you meet these expectations.
As mobile app competition grows, developers must focus on efficiency. Having a floating action button puts key features within quick reach. This means less frustration for users and greater engagement with your app.
Appilix, a leading no-code app builder, makes it incredibly easy to add a floating action button to your app. With just a few clicks, you can provide a premium experience without deep coding knowledge. That means you save time, avoid technical hurdles, and can launch updates faster.
Floating action buttons aren’t just trendy—they serve a critical function. Whether you want users to compose a message, upload a photo, or start a chat, a floating action button helps guide them intuitively. This small UI element can have a big impact on retention and satisfaction.
Adding the floating action button with Appilix also keeps your app looking modern and professional. Users are familiar with the floating action button pattern from apps like Gmail and WhatsApp. They expect this kind of shortcut, and it makes your app feel instantly trustworthy.
Throughout this article, we’ll guide you step-by-step. By the end, you’ll know how to design, implement, and optimize a floating action button with Appilix to speed up your app actions and delight your users.

A floating action button in mobile apps is a prominent circular button that hovers above the main content. It is used to highlight the most important or commonly used action within an app screen. The floating action button usually sits at the bottom right corner, making it easy to spot and reach with your thumb.
Unlike traditional buttons that blend into the background, the floating action button stands out. Its bold color, shadow, and floating effect draw immediate attention. Users can quickly identify it as the fastest way to perform a key action in the app.
Developers love the floating action button because it enhances both design and usability. It simplifies navigation and puts the focus on a single, high-priority task. When used correctly, it can drastically improve how users interact with your app.
In most cases, the floating action button is associated with a single, core function—such as creating a new post, composing a message, or starting a call. By reducing clutter and focusing attention, it provides a seamless user experience.
The floating action button is not just a design trend. It’s a proven interface pattern supported by leading platforms like Google’s Material Design. This makes it a safe and effective addition for almost any type of app.
Implementing a floating action button in your app offers a wide range of benefits. First and foremost, it significantly speeds up user actions. By giving users a clear shortcut, you reduce the time and effort needed to reach essential features.
A floating action button improves user engagement. When people find it easier to use your app, they are more likely to return and interact with it. This can translate directly into higher retention and greater revenue opportunities.
Data from industry studies show that apps with a floating action button enjoy better conversion rates. According to Statista, apps with prominent shortcuts like the floating action button report up to a 27% increase in daily active usage compared to apps without one.
Here is a quick summary of key benefits:
Let’s look at some statistics for further insight:
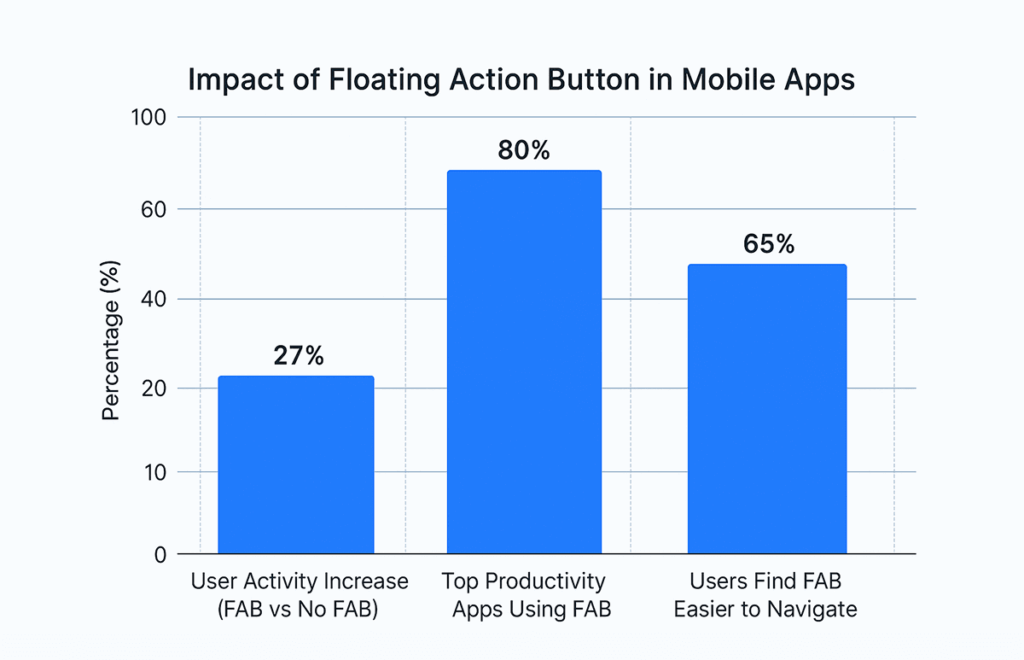
Adding a floating action button to your app, especially with a tool like Appilix, can be a game changer. The numbers don’t lie—users love it, and so do app owners.
The floating action button you get from Appilix isn't a JavaScript-rendered widget living inside your webview — it's a native Android and iOS UI element, controlled entirely from your Appilix dashboard. That means it performs the same way no matter what your website is built with.
Skip Material-UI's Fab component or a custom build entirely. Once converted with Appilix, you get a high performance React floating action button rendered natively, not by React's virtual DOM — arguably the best React floating action button in the market for teams who want speed without extra code.
Vue developers usually reach for a third-party plugin to add a FAB to a Vue app. With Appilix, your Vue website gets the same native speed automatically once converted — no extra dependency to maintain, no plugin to keep updated.
Angular Material's fab button works fine on the web, but Appilix's version isn't tied to Angular's change detection cycle or component tree — it renders natively above your webview, so it stays just as responsive.
Building a feature rich JavaScript floating action button from scratch usually means hand-rolling CSS animations and touch handling yourself. Appilix gives you a fast JavaScript floating action button with full JavaScript floating action button control, configured entirely through your dashboard — no extra code required.
If you want to add a floating action button to your app, Appilix offers a streamlined and user-friendly process. You don’t need to write a single line of code. Just follow these simple steps:
With these simple steps, anyone can add a floating action button and speed up user actions without technical barriers.
A floating action button is powerful, but using it wisely is essential for best results. Follow these tips and best practices to ensure your floating action button adds value, not confusion.
Only use a floating action button for your app’s most important action. Avoid cluttering the interface with multiple floating action buttons, as this can overwhelm users.
Stick to design guidelines provided by platforms like Android and iOS. Maintain consistency in color, size, and placement to match user expectations and provide a familiar experience.
Your floating action button should be easily reachable, especially for one-handed use. Make sure it stands out but does not obstruct important content.
Choose an icon that clearly represents the action your floating action button performs. If the action is not obvious, consider adding a tooltip or brief label.
While subtle animations can enhance engagement, avoid excessive motion that might distract users.
Applying these best practices helps your floating action button deliver the maximum benefit for your app and users.
The floating action button with Appilix is an easy way to speed up your app actions and create a seamless user experience. By guiding users toward your most important features, you enhance satisfaction and increase engagement.
Appilix empowers you to add, customize, and optimize the floating action button in minutes, all without coding. With careful design and strategic placement, your app can stand out in a crowded marketplace. The floating action button is more than just a trendy feature—it’s a proven tool for boosting your app’s performance.
If you want to give your users the best experience, start by adding a floating action button with Appilix today. Your app’s success could be just one click away.

Appilix can help. Let's start!